Minnie Mouse Ears Headband Minnie Mouse Ears Clip Art

Today'southward tutorial is a DIY Minnie Mouse Headband. With Halloween just around the corner, I know y'all've probably started thinking about your kids' costumes. I know not anybody feels the same way, but I genuinely bask making my kids' costumes. Information technology's a fun way to go creative, and my kids like to get involved as well by making requests and helping pick out patterns and textile.
Costume making doesn't accept to be intimidating. In fact, today I'll show yous a simple tutorial for making a Minnie Mouse headband with a bow and ears. Pair the headband with a homemade polka dot apparel or even a store-bought one for a complete costume. These are likewise great if you're taking a trip to Disneyland or World. Just a fun, unproblematic way to enjoy the magic!

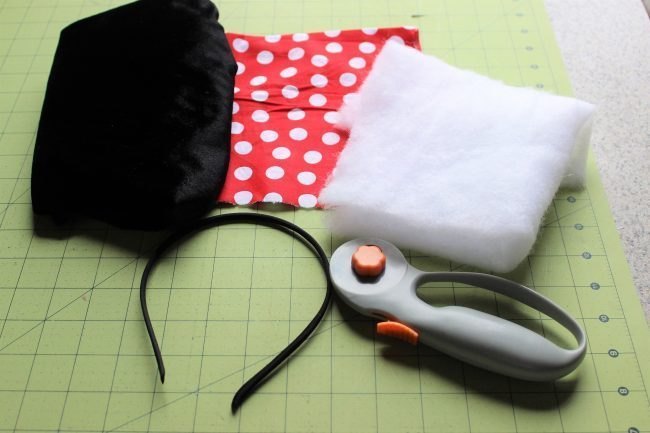
DIY Minnie Mouse Headband Supplies:
- Polka Dot fabric -scrap piece or ane/8th thou)
- Blackness fabric (I prefer to use a velvet) -flake piece or 1/8th yard
- For your fabric bank check out www.knitfabric.com
- Batting
- small blackness headband
- basic sewing notions (thread, scissors, ruler, ect.)
DIY Minnie Mouse Headband Instructions:
Cutting Fabric
Let's start with cutting your fabric. First, you'll need to cut out 2 squares of your polka dot textile measuring 5×five inches. Next, cutting a piece of batting the same size. (Y'all are welcome to make your bow bigger or smaller based on personal preference. This is just the size I like all-time.) Then cutting a strip of polka dot fabric to be 2.5×4 inches. This will exist for the center of the bow. Finally, cutting iv circles of black material and 2 circles of the batting material. You lot can use anything round to trace around. (I created an easy template for myself by tracing around a ribbon spool.)


DIY Minnie Mouse Headband Sewing
Next we'll motion on to the sewing. First, take your two squares of polka dot fabric and face them right sides together. Side by side, place them on top of a foursquare of batting. Then pin in identify. Sew together (or serge) effectually all four sides of the square using a 1/4 inch seam. Still, BE SURE TO Exit a 1 INCH OPENING so you can plough it right side out. I similar to round my corners every bit well, but this is totally optional.


DIY Minnie Mouse Headband Ironing
Flip your square right side out and turn the raw edged from the opening in towards the inside. Next, requite it a dainty press with the hot fe. (You can choose to sew the opening closed, merely I find information technology uneccesary as it will somewhen be covered up by the center piece of the bow.)

DIY Minnie Mouse Headband Folding
Next, accordion fold the center of square (starting where your opening is) to create your bow. And then wrap a piece of thread effectually the middle tightly, several times and tie a knot in the back.


DIY Minnie Mouse Headband Middle Slice
Now we'll create the center slice for the bow. First, take your strip of cloth and fold it in half hot dog mode, right sides together. And so sew downwards the long side of the material, creating a narrow tube.

Turn the tube correct side out. Line the seam up in the back middle, and give it a skilful press with the fe.

Next, fold the strip in half so that the raw edges are touching and the seam line is on the exterior. Then sew the short ends together using a 1/two inch seam allowance.

Next, flip your lilliputian band correct side out so the seam lines are hidden in the inside. Finally, insert the ring around the bow and position information technology in the center. Look how beautiful that bow is! At present y'all can slide the bow on to your headband.


Next we'll create the ears. Take 2 of your black circles and identify them right sides together. Pin on pinnacle of a circumvolve of batting. Sew effectually the outside, beingness sure to leave a modest opening.

Flip your circle right sides out through the opening you left. Now tuck in the raw edges of the opening and fold that portion of the ear up 1/2 inch towards the back side of the ear. Then sew in identify using BLACK thread to hide your stitches. Now, you have simply created a aqueduct that you can slide your headband through. Afterwards, practice the same thing with the other ear and you are finished.

You can arrange the bow and ears to your liking simply by sliding them along the headband until they are positioned correctly.

There y'all have it! You created a Minnie Mouse Bow and Ears headband and it wasn't that difficult was it?

If you enjoyed this tutorial, check out some of our other patterns and tutorials:
Practical Princess Dress: https://www.peekaboopatternshop.com/applied-princess/
Gratis Disney Vacation Planning Trips: https://world wide web.peekaboopages.com/2012/07/free-disney-vacation-planning.html
Source: https://www.peekaboopages.com/2018/09/diy-minnie-mouse-headband.html